
How to Draw a Skull: Step-by-Step Guide for Beginners
Introduction
Learning how to draw a skull can feel intimidating, but with the right approach, even a beginner can create striking, anatomically pleasing drawings. This guide offers a clear, step-by-step method—from basic shapes, construction lines, and facial landmarks, to shading and detail refinement—you’ll learn the essentials of skull proportions and structure. We’ll explore both simplified and realistic techniques, referencing expert tutorials and artistic approaches to help you build confidence and improve your anatomical accuracy. Let’s break down the skull into manageable parts and unleash your drawing potential.
1. Start with Construction and Basic Shapes
Use a circle or oval for the cranium; add a center line vertically and horizontal guidelines for the eye line, nose base, and mouth line to map proportions (Loomis-style method).
- As a Reddit artist advises:
“You should be using construction lines… a center line needs to be established. The skull is symmetrical … construction line for the eyes, nose … should be established”. - Sketch overlapping shapes—like three spheres representing the brow, cranium, and jaw—to grasp the skull’s 3D form.
- This helps with symmetry, perspective, and later detail placement.
2. Map Facial Features: Sockets, Nose, Jaw
- Within your base, draw eye sockets and the nasal cavity. The nose isn’t a shape but a “big hole”—focus its placement along guides.
- Define cheekbones, jawline, and contour of the skull. In three-quarter views, emphasize temple, zygomatic bone, and jaw curves.
- A simplified method (as seen on some blogs): “Draw a circle, add eyes, then a nose (upside-down heart), cheek bones, teeth, and add details…”.
3. Teeth and Mouth Detail
- Draw teeth starting with a U-shape or two curves. Add parallel line for tooth row, then vertical strokes for individual teeth.
- Ensure alignment with the central symmetry line. Slight imperfections add realism—teeth aren’t uniform.
4. Add Anatomy and Realism
- To elevate your drawing, study skull anatomy: brow ridge, temple indentation, zygomatic arches, dental arch, jaw angles.
- As one art student shares: building the skull from basic shapes helps internalize proportions and mechanics—this becomes a “solid foundation” for drawing freely.
- Practice drawing from reference photos or use a physical replica—this enhances anatomical understanding.
5. Shading and Final Refinement
- Add shading to bring depth—darken eye/nose cavities, below cheekbones, jaw junctions.
- Focus on light vs shadow: darkest in cavities, softer tones on bone surfaces to create volume.
- Highlight anatomical landmarks (brow, zygomatic bone), and smooth transitions to avoid flatness.
- Experiment with more stylized or decorative skull art, like Day of the Dead sugar skulls or embellishments once you’re comfortable.
6. Practice from Multiple Angles and Styles
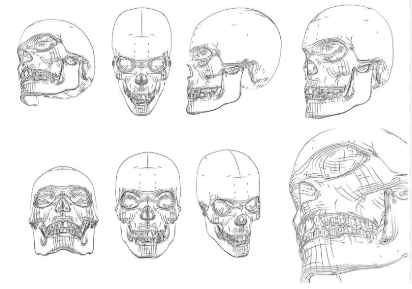
- Don’t limit to front view—try side, three-quarter, top-down views. Use base construction lines to guide perspective.
- As a Reddit contributor puts it: “break the head down into three overlapping spheres… carve in the silhouette and main features” to adapt across angles.
- Mix realistic and stylized approaches, adding personality while retaining correct structure.
Conclusion
Mastering how to draw a skull is about building from simple shapes and anatomical understanding—enforced by guidelines, observations, and practice. Start with a circle or sphere, add symmetry lines, map out eye sockets, nose cavity, cheekbones, jaw, and teeth. Then layer in shading, detail, and personal style. Reference photos and even a small skull model greatly accelerate learning.
With focused efforts—studying anatomy, exploring angles, embracing imperfections—you’ll steadily improve both technical accuracy and creative expression. Whether you’re sketching a realistic human skull or designing a stylized motif, these techniques give you clarity, confidence, and a strong drawing foundation. Keep experimenting, stay patient, and enjoy the process!
5 FAQs (People Also Ask style)
- How do I start drawing a skull for beginners?
- Begin with a circle or oval, draw center and horizontal guide lines for eyes, nose, mouth; it sets up accurate proportions.
- Begin with a circle or oval, draw center and horizontal guide lines for eyes, nose, mouth; it sets up accurate proportions.
- What is the easiest way to draw skull features?
- Use simple shapes: circles for sockets, upside-down heart for nose cavity, U-shapes and lines for teeth and jaw—then refine anatomy.
- Use simple shapes: circles for sockets, upside-down heart for nose cavity, U-shapes and lines for teeth and jaw—then refine anatomy.
- How do construction lines help in skull drawing?
- They establish symmetry and placement; aligning features like sockets, nose, mouth along parallel lines ensures anatomical accuracy.
- They establish symmetry and placement; aligning features like sockets, nose, mouth along parallel lines ensures anatomical accuracy.
- Should I study skull anatomy when drawing?
- Yes—learning underlying structures like cheekbones, zygomatic arch, and jaw helps enhance realism and confidence in any angle.
- Yes—learning underlying structures like cheekbones, zygomatic arch, and jaw helps enhance realism and confidence in any angle.
- What role does shading play in skull drawings?
- Shading defines form and depth—using darker tones in cavities and softer transitions on rounded surfaces helps create a lifelike, three-dimensional appearance